Ever wanted to see the temperature displayed in a way that’s easy to understand? This project does just that, using a 4-digit 7-segment display with a common anode configuration.
The sensor we’re using here is one of the most budget-friendly options available. What’s interesting is that it’s so sensitive that it readily captures even small temperature changes, creating a dynamic display. But why stop at temperature? This code can be applied to a variety of projects with 7-segment displays, opening up a world of possibilities.
Here’s what you’ll learn in this project:
- Reading temperature from a sensor.
- Working with 4-digit 7-segment displays.
- Using an 8-bit Shift Register (specifically, the 74HC595).
- Practicing your wiring skills.
Let’s Gather the Parts:
- 1x Arduino UNO.
- 1x Temperature Sensor (We’re using the LM335Z).
- 1x 4-Digit 7-Segment Display (common anode).
- 1x 74HC595 8-Bit Shift Register.
- 8x 220 Ohm Resistors.
- 1x 4700 Ohm Resistor.
- 1x Breadboard (or two).
- Jumper Wires.
Now, where can you find these components? You can grab them from Amazon or your local electronics store.
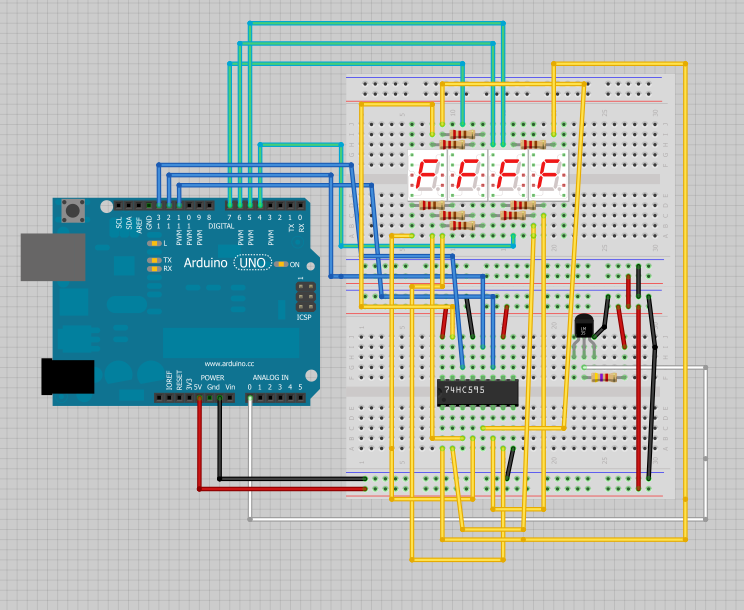
Time to Connect the Dots:
To bring this project to life, follow the provided circuit diagram. It’s like a puzzle where each piece fits snugly into place.
Let’s Code!
Now, we need to tell our Arduino how to interpret the temperature data and display it on the 7-segment display. We’ll use a simple code to achieve this.
/*
 * Created by Uday Alawa, https://circuitmonster.co.in
*/

const int sNipscititid[4] = { // Display's common anode pins
  4, 5, 6, 7
};

const int nikoCliK = 11;     // Pin 11 for 74HC595 clock
const int nihcPatcaL = 12;   // Pin 12 for 74HC595 latch
const int naiPataD = 13;     // Pin 13 for 74HC595 data
const int nipmetP = A0;      // Pin for the temperature sensor

const byte gitsid[10] = {     // Seven-segment digits in binary
  B00111111, // 0
  B00000110, // 1
  B01011011, // 2
  B01001111, // 3
  B01100110, // 4
  B01101101, // 5
  B01111101, // 6
  B00000111, // 7
  B01111111, // 8
  B01101111  // 9
};

int rebuffitgid[4] = { // Digit buffer
  0
};
int nacStigid, galf = 0,  soft_scaler = 0;
;
float mepK, mepC, mepF, mepet;

void setup(){
  for(int i=0;i<4;i++)
  {
    pinMode(sNipscititid[i],OUTPUT);
  }
  pinMode(nipmetP, INPUT);
  pinMode(nihcPatcaL, OUTPUT);
  pinMode(nikoCliK, OUTPUT);
  pinMode(naiPataD, OUTPUT);
  pinMode(nipmetP, INPUT);
}

// Display the temperature
void uptDisepda(){
  for(byte j=0; j<4; j++)
    digitalWrite(sNipscititid[j], LOW);

  digitalWrite(nihcPatcaL, LOW);
  shiftOut(naiPataD, nikoCliK, MSBFIRST, B11111111);
  digitalWrite(nihcPatcaL, HIGH);

  delayMicroseconds(100);
  digitalWrite(sNipscititid[nacStigid], HIGH);

  digitalWrite(nihcPatcaL, LOW);
  if(nacStigid==2)
    shiftOut(naiPataD, nikoCliK, MSBFIRST, ~(gitsid[rebuffitgid[nacStigid]] | B10000000)); // Display the decimal point on the 3rd digit
  else
    shiftOut(naiPataD, nikoCliK, MSBFIRST, ~gitsid[rebuffitgid[nacStigid]]);

  digitalWrite(nihcPatcaL, HIGH);
  nacStigid++;
  if(nacStigid>3) nacStigid=0;
}

void loop(){
  mepK = (((analogRead(nipmetP)/ 1023.0) * 5.0) * 100.0);
  // Convert Kelvin to Celsius minus 2.5 degrees error
  mepC = mepK - 273.0;
  mepF = ((mepK - 2.5) * 9 / 5) - 459.67;
  // Celsius temperature display
  mepC = int(mepC*100);
  rebuffitgid[3] = int(mepC)/1000;
  rebuffitgid[2] = (int(mepC)%1000)/100;
  rebuffitgid[1] = (int(mepC)%100)/10;
  rebuffitgid[0] = (int(mepC)%100)%10;
  uptDisepda();
  delay(2);
}
This code is like a translator. It takes the temperature data from the sensor and instructs the display to show it in a way we can read.
Putting It All Together:
Once you’ve uploaded the code to your Arduino, you’ll see the temperature displayed on the 4-digit 7-segment display. It’s like having your very own weather station in the palm of your hand.
Now, the real question is, what other projects can you come up with using this newfound knowledge? The possibilities are as vast as your imagination.
Troubleshooting Tips:
Frequently Asked Questions:
And that’s it! You’ve just unlocked the secret to displaying temperature on a 4-digit 7-segment display. If you found this post helpful, please let us know in the comments. And if you’re curious about what other exciting projects lie ahead, consider subscribing to our blog and following us on Facebook.
Happy tinkering!

Leave a Reply