Table of Contents
In a world where online privacy is becoming increasingly important, many individuals and organizations are seeking ways to protect their online activities from prying eyes. One effective method to enhance your online privacy is by using the Tor network, which stands for “The Onion Router.” Tor is a free and open-source software that helps you anonymize your internet traffic by routing it through a series of volunteer-operated servers. In this comprehensive guide, we will explore how you can connect your Raspberry Pi to the Tor network to bolster your online privacy.

Why Use Tor on Raspberry Pi?
Raspberry Pi is a versatile and affordable single-board computer that is widely used for various projects, including home automation, media centers, and even as a small web server. When you connect your Raspberry Pi to the Tor network, you can add an extra layer of privacy to its internet activities. Here are a few reasons why using Tor on a Raspberry Pi can be beneficial:
1. Enhanced Privacy: By routing your internet traffic through the Tor network, you can hide your IP address and location from websites and online services, making it much harder for anyone to trace your online activities back to you.
2. Bypassing Censorship: In some countries, access to certain websites and online services may be restricted or censored. Tor can help you bypass these restrictions and access a free and open internet.
3. Securing IoT Devices: If you use Raspberry Pi for home automation or IoT projects, connecting it to Tor can help protect the privacy of your smart devices by masking their IP addresses. here is detailed blog.
4. Research and Experimentation: If you’re interested in cybersecurity or privacy-related research, setting up Tor on Raspberry Pi provides a hands-on learning experience.
Now, let’s dive into the steps to connect your Raspberry Pi to the Tor network:
Step 1: Preparing Your Raspberry Pi
Before you can use Tor on your Raspberry Pi, you’ll need to ensure that your device is up to date and has the necessary software installed. Here’s what you need to do:
Update Raspbian: If you’re using Raspbian as your operating system, open a terminal and run the following commands to update your system:
sudo apt-get upgradeInstall Tor: Next, you’ll need to install the Tor software. Run the following command:
sudo apt-get install torStep 2: Configuring Tor
Once you have Tor installed, you’ll need to configure it to run on your Raspberry Pi. Here’s how to do it:
Edit the Tor Configuration File: Open the Tor configuration file for editing by running:
sudo nano /etc/tor/torrcIn the configuration file, you can make various adjustments. For basic Tor usage, you don’t need to make extensive changes. However, you may want to look for the following lines and make sure they are uncommented (remove the ‘#’ symbol at the beginning of the line if it exists): ControlPort 9051 CookieAuthentication 1
These lines enable control of the Tor service and enable cookie-based authentication.
Restart Tor: Save the changes to the configuration file and exit the text editor. Then, restart the Tor service:
sudo service tor restartStep 3: Testing Tor
To confirm that Tor is running on your Raspberry Pi, you can check its status. Run the following command:
sudo service tor statusIf Tor is running correctly, you should see a message indicating that it’s active.
Step 4: Configuring Your Web Browser
To start using Tor for your web browsing activities on your Raspberry Pi, you’ll need to configure your web browser to use the Tor network. Most commonly, the Tor Browser is used for this purpose, as it’s pre-configured to work with Tor. You can download the Tor Browser for Raspberry Pi from the official Tor Project website.
Once you’ve installed and launched the Tor Browser, you can start browsing the internet with enhanced privacy.
Part 2: Configuring and Optimizing Your Tor Setup on Raspberry Pi
In Part 1, we covered the basics of why you might want to use Tor on your Raspberry Pi and how to get started with the installation. Now, in Part 2, we’ll delve deeper into configuring and optimizing your Tor setup to maximize your privacy and security.
Step 5: Using the Tor Browser Bundle
As mentioned in Part 1, one of the simplest ways to use Tor on your Raspberry Pi is by using the Tor Browser Bundle. This browser is pre-configured to route all its traffic through the Tor network. Here’s how to set it up:

- Download the Tor Browser Bundle: Visit the official Tor Project website (https://www.torproject.org/) and download the Tor Browser Bundle for Linux ARM. Make sure you choose the correct architecture for your Raspberry Pi.
- Extract and Run: After downloading, extract the archive to a location of your choice. You can do this using the following commands in the terminal (replace
<filename>with the name of the downloaded file): tar -xf cd tor-browser ./start-tor-browser.desktop
This will launch the Tor Browser.
Step 6: Configure Browser Settings
Once the Tor Browser is running, you can further enhance your privacy by configuring its settings:
- Security Level: By default, the Tor Browser uses a “Standard” security level, which provides a good balance between security and usability. However, if you have specific privacy needs, you can adjust the security level by clicking on the shield icon in the address bar.
- NoScript: The Tor Browser comes with the NoScript add-on, which blocks JavaScript on websites. While this enhances security and privacy, it can also affect the functionality of some sites. You can adjust NoScript settings by clicking on the NoScript icon in the browser toolbar.

Step 7: Additional Tips for Privacy
To further enhance your online privacy when using Tor on your Raspberry Pi, consider the following tips:
- Avoid Downloading Files: Downloading files while using Tor can potentially compromise your anonymity. Try to avoid downloading files or opening attachments from untrusted sources.
- Use HTTPS: Whenever possible, use websites that support HTTPS. This helps encrypt your traffic between your Raspberry Pi and the website, adding an extra layer of security.
- Avoid Login Credentials: Don’t log in to your personal accounts or provide sensitive information while using Tor. The purpose of Tor is to anonymize your internet traffic, but logging in with personal credentials can reveal your identity.

Step 8: Monitoring Your Tor Connection
To monitor the status of your Tor connection and gather information about the Tor network, you can use various command-line tools on your Raspberry Pi. Here are a few commands you can use:
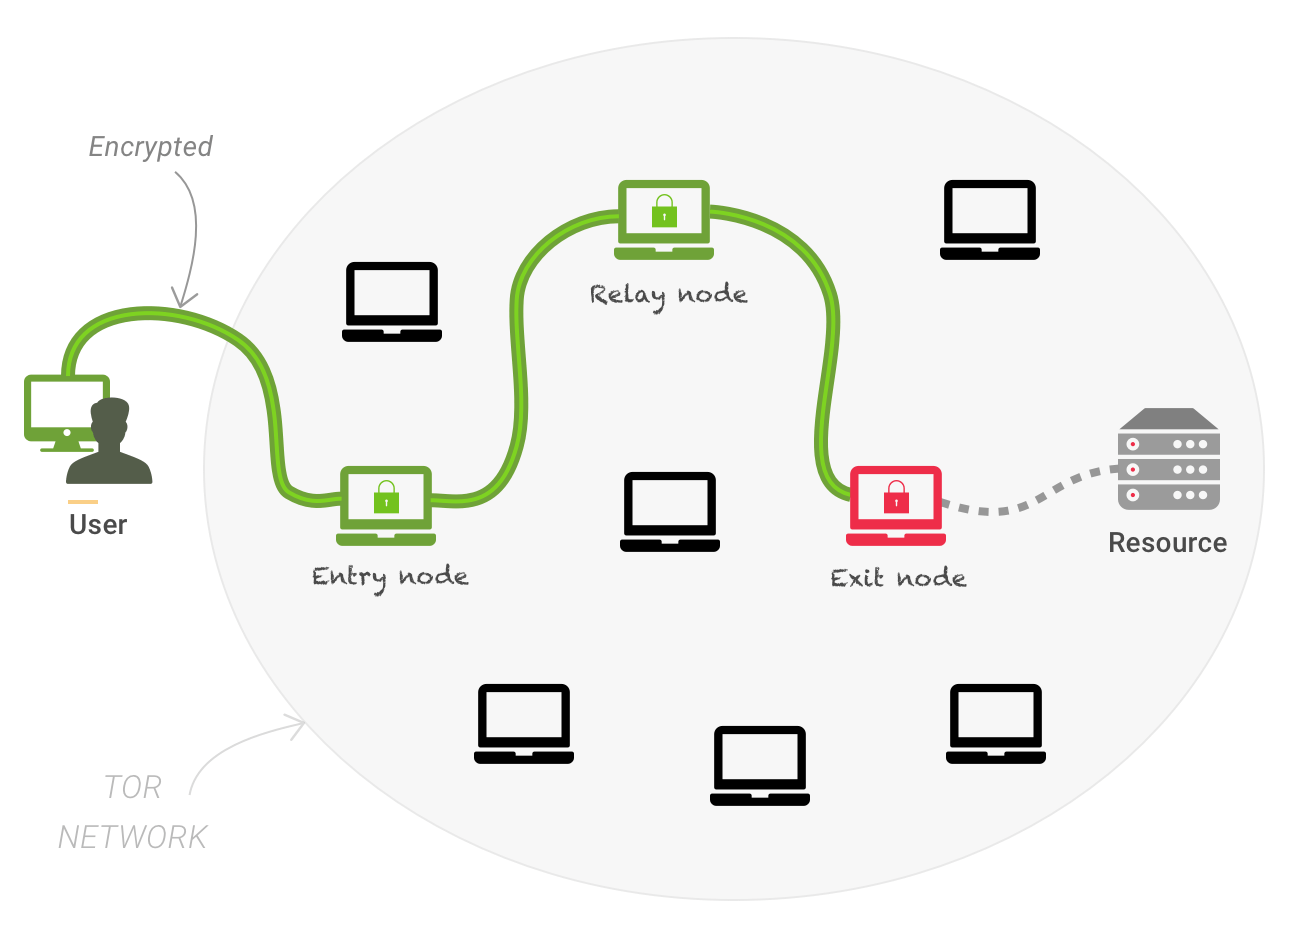
- Check Tor Circuit: To see the current circuit (the series of nodes your traffic is passing through), run:
nyx - Check Tor Network Status: To view information about the Tor network, such as the number of nodes and their locations, you can use: arm
Part 3: Advanced Configurations and Use Cases for Tor on Raspberry Pi
In Part 2, we explored how to use the Tor Browser Bundle on your Raspberry Pi and configure its settings
for enhanced privacy. In Part 3, we’ll delve deeper into advanced configurations and potential use cases for Tor on your Raspberry Pi.
Step 9: Setting Up a Tor Proxy

While the Tor Browser Bundle is convenient for web browsing, you can also use Tor as a system-wide proxy on your Raspberry Pi. This allows all network traffic to be routed through the Tor network, not just web browsing. Here’s how to set it up:
- Install Privoxy: Privoxy is a web proxy server that can work alongside Tor to route all network traffic. Install Privoxy with the following command: sudo apt-get install privoxy
- Configure Privoxy: Edit the Privoxy configuration file by running: sudo nano /etc/privoxy/config
- Add the following line to the end of the file to forward traffic to the Tor SOCKS proxy: forward-socks5 / 127.0.0.1:9050 .
- Save the file and exit the text editor.
- Restart Privoxy: Restart Privoxy to apply the changes: sudo service privoxy restart
Learn more on Setting Up a VPN Server on Raspberry Pi: A Comprehensive Guide
Now, all network traffic on your Raspberry Pi will be routed through the Tor network.
Step 10: Using Tor for Command Line Applications
You can also use Tor for command-line applications that require internet access. One common tool for this purpose is “torsocks.” Install it with:
sudo apt-get install torsocksThen, you can run any command with torsocks to route its network traffic through Tor. For example:
torsocks wget https://example.comThis can be useful for applications like email clients or other tools that you want to use with Tor.
Step 11: Secure File Sharing with OnionShare

OnionShare is a unique tool that allows you to securely share files over the Tor network. You can install it on your Raspberry Pi with:
sudo apt-get install onionshareOnce installed, you can run OnionShare from the terminal and follow the on-screen instructions to create a secure file sharing service. This can be useful for sharing sensitive files anonymously.
Step 12: Building a Private Tor Node
If you want to contribute to the Tor network by running your own Tor node on your Raspberry Pi, you can do so. However, running a Tor exit node requires careful consideration and understanding of the legal implications. Running a non-exit relay is a safer option. You can find detailed instructions on the Tor Project’s website on how to set up a relay or exit node.
Part 4: Tips and Best Practices for Using Tor on Raspberry Pi
In this final part of our guide, we’ll provide you with some additional tips and best practices to ensure a secure and efficient Tor experience on your Raspberry Pi.
Step 13: Regularly Update Your Software
Just like any other software, Tor and its related components may receive updates and security patches. It’s crucial to keep your Raspberry Pi and the Tor software up to date to benefit from the latest security improvements and bug fixes. To update your system and Tor, use the following commands:
sudo apt-get update

sudo apt-get upgrade

sudo apt-get dist-upgrade
Step 14: Be Cautious with Web Plugins
While using the Tor Browser, be cautious about enabling browser plugins like Flash or Java. These plugins can potentially compromise your anonymity and security. Tor Browser is configured to disable most plugins by default for a reason.
Step 15: Use Secure Passwords
Whenever you access websites or online services through Tor, make sure to use strong, unique passwords. Consider using a password manager to generate and store complex passwords securely.
Step 16: Respect Website Policies
While Tor can provide anonymity, some websites may have policies against Tor exit nodes. If you encounter such websites, it’s best to respect their rules and use alternatives whenever possible.
Step 17: Regularly Clear Browser Data
In the Tor Browser, it’s a good practice to regularly clear your browsing data, including cookies, history, and cache. This helps maintain your privacy and prevents websites from tracking you over time.
Step 18: Disable JavaScript When Not Needed
While JavaScript can enhance the functionality of websites, it can also be used to identify and track users. Consider disabling JavaScript in the Tor Browser for websites that don’t require it.
Step 19: Consider the Legal Implications
Using Tor is legal in most countries, but it’s essential to be aware of local laws and regulations regarding online privacy and anonymity. Some activities, such as accessing illegal content or engaging in cybercrime, are not protected by Tor and can have legal consequences.
Step 20: Support the Tor Network
If you find value in using Tor and believe in the importance of online privacy, consider supporting the Tor network by donating to the Tor Project or volunteering as a relay operator. Your contribution helps maintain and expand the Tor network for everyone’s benefit.
Conclusion
In this comprehensive guide, we’ve covered everything you need to know about connecting your Raspberry Pi to the Tor network for ultimate online privacy. From the basics of setting up Tor to advanced configurations, use cases, and best practices, you now have the knowledge to safeguard your online activities and protect your privacy in an increasingly connected world.
By following the steps outlined in this guide and adhering to best practices, you can make the most of the Tor network on your Raspberry Pi, bolstering your online privacy and security. Thank you for prioritizing your online privacy, and happy browsing on the Tor network!

Leave a Reply